Blog Questions

I have had several people ask how I create my blog so I thought I would let you all know what I’ve done and continue to do for this blog.

First, I purchased my domain so I could call it “Keep Inking Up.com” and direct people to it easily.

I then created the blog in Word Press using one of their templates.  They have so many to choose from!  Someday you might see a change in my layout if I decide to use another template Smile. But I’m fairly happy with this one so I may stick with it, at least for another year or so.

The design of the banner was competed in My Digital Studio, a digital software by Stampin’ Up!.  I am a clean and simple person so I didn’t want to design anything too fussy.  That’s also why I chose this template since it is clean and simple as well.

I get most of my images related to Stampin’ Up! from their website and simply upload them and insert them into the posts or sidebars.

As far as the posts, it’s a straight forward process through Word Press.  I really don’t have to do much but click and type, plus upload a picture every now and then.  So I do all of the work myself since I do not have any employees (yet) and it’s not all that difficult.  Now it isn’t as fancy as other blogs with moving images, tabs and such.  But I am able to post information easily and quickly.

If anyone has any more specific questions, please continue to add them in the comments and I’ll be sure to answer them as best as I can.

Share and Enjoy:
  • Print
  • Facebook
  • Twitter

Leftovers

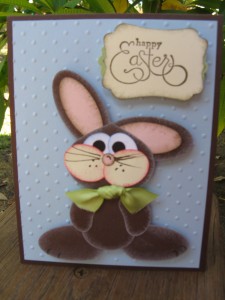
Ever start a project, but don’t finish it right away?  My desk is usually littered with parts of projects that didn’t get finished.  I really MUST plan my projects better Surprised.  Anyway, I came across this adorable punch art bunny on Kay Sha’s blog several months ago and just HAD to make a bunny right then.  So I had a bunny leftover sitting on my desk.  And I had the embossed background as well.  And a tiny piece of satin ribbon.  So I decided to use these leftovers and finish a card!  What a concept, right?  And since he is a bunny, I used an Easter sentiment from a retired stamp set on my shelf.  Google Kay Sha to find her blog – she’s amazing!  The bunny was created with numerous punches, mostly ovals, but also the owl and bird builder punches.  Most of the pieces were sponged to help create depth and to make him look “furry.”  Now I have an Easter card ready to go for next year.  I still have more leftovers sitting on my desk – I’ll try to use them another day.
Share and Enjoy:
  • Print
  • Facebook
  • Twitter

Big Shot Scallop Flower

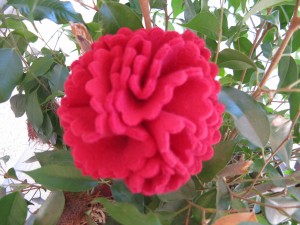
Flower embellishments are all the rage these days.  You’ve probably seen tons of YouTube videos on how to make fabric flowers.  I have!  And I finally got around to making one for myself!  Again, using my favorite tool – the Big Shot (113439) and the Scallop Circle die (113468).  I had some leftover red fleece when I made a superman cape for my son.  Using just six scallops, this flower became quite fluffy.  I think I will sew a pin on the back so my daughter can attach it to her school backpack – her school colors are red and silver Smile.  The best part is, it took very little time.  That’s the advantage of the Big Shot!  I was able to cut 3 scallops at a time and just sewed them together (after folding them 3 times) at their tips.  The flower came into shape on it’s own and I simply hot-glued a circle on the back for a base (to which I will attach the pin).  This is a terrific and easy project to add some style to a bag, hat, scarf or headband.  If you would like more details on how to make these, just contact me to schedule a workshop.

Share and Enjoy:
  • Print
  • Facebook
  • Twitter

Simply Scored Scoring Tool

Product Review – The Simply Scored Scoring Tool from Stampin’ Up! in the current Holiday Mini Catalog available now through Jan. 3, 2012

SU scoring tool

Simply Scored Scoring Tool,

• Item #122334, $29.95,
includes scoring board, three place markers and one double ended comfort-grip stylus;

Why would you want THIS one? It is Amazing! and so different in so many ways! It completely takes the chore out of scoring!

• The Simply Scored Scoring Tool’s base fits paper or card stock up to 12″ x 12″

•  features score tracks every 1/8″.

• Features two easy-to-read rulers (with inch markings down to 1/8″) along top and left side for perfect scoring. (One standard left-to-right ruler and one zero center ruler.) A ruler for centering your project! AWESOME!

•  Includes three markers that easily fit in the board every 1/8″ so you can keep your place when having to score and hold your place so you don’t have to keep searching for where you need to score each time! WOOHOO! Terrific for making multiple boxes!  You can order more markers, if you find that your projects call for more.

• Includes a stylus. Which is MUCH better then the plastic bone folder you get with other brands – the stylus doesn’t wear down! You have two sides, one for cardstock and one for designer paper so that you don’t rip anything.  Try both sides to see which you prefer.

• Has a HUGE secret tray/compartment at the top to hold anything you want! Stash your bone folder, stampin money, hold  your lipstick… whatever you need!

• Bottom of base has nonmarking and nonskid feet to secure it on your work surface

• Base measures Approximately 15-1/8″ x 13-1/4″ x 1″.

I already own another scoring tool, so why get this one?  Well, mine didn’t have tracks at every 1/8″ which was okay, but having more options is better!  I’ve been wanting to get an upgrade due to the limited tracks and this one came along just in time!  LOVE IT!  If you already have a scoring tool that uses a bone folder, I do recommend that you at least get our Simply Scored Stylus, item #125624 for just $4.50.  As mentioned earlier, it won’t wear down like the other tools as it has high quality metal tips at both ends.  And one more tip – run your stylus slowly down each track to avoid jumping the track.  With a bit of practice, you’ll find your optimum speed.  So order your Simply Scored Scoring Tool or Stylus today by going to my online store.

Share and Enjoy:
  • Print
  • Facebook
  • Twitter

soft “thinking of you” card

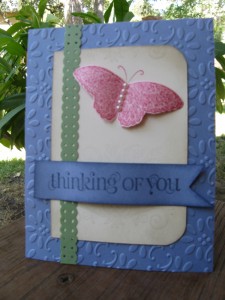
A good friend of mine is going through a rough time, recovering from surgery.  I wanted to let her know she continues to be in my thoughts and prayers. To make a more feminine card, I chose soft colors and added some pearl embellishments.  I started with Brocade Blue card stock as my card base (sorry it’s a retired  color, but I must use what I have) and ran it through my Big Shot(113439), since it IS my favorite tool of all time, with the the Finial Press embossing folder(115963).  Immediately I have a beautiful card already!  Then I added a Very Vanilla(101650) insert, rounded the corners on one side and stamped the scroll image from the Strength & Hope stamp set with Crumb Cake(121030), stamping off some ink for a very subtle background.  To soften the edges, I sponged them with Crumb Cake. Before attaching this piece to my card, I stamped the butterfly from the Strength & Hope stamp set in Rose Red(101778) toward the top.  I hope you were able to get this set before the end of last month!  I also stamped this butterfly on Pink Pirouette card stock(111351), again with Rose Red ink, cut it out and attached it directly on top of the stamped image on the Very Vanilla piece, curling the wings slightly with my bone folder to make it look like it is flying.  Having the antennae already stamped on the Very Vanilla allowed me to not need to cut them out of the Pink Pirouette image – very helpful!  I added some pearls from the Basic Pearls(119247) to indicate the body of the butterfly – I’ve seen this many times.  Instead of adding ribbon, I decided to use the Dotted Scallop Ribbon border punch(119275) with Wild Wasabi card stock(108641).  Ribbon would look beautiful as well.  For the sentiment, I stamped Night of Navy(102977) on a scrap piece of Brocade Blue using the Curly Cute stamp set(117014 for wood, 120510 for clear).  I cut the tail using the 1-3/8″ square punch(119877).  I could have just used scissors, but using this punch was  much quicker Smile.  I sponged the edges with Night of Navy to help define it from the background, curled the ends of this little banner to add some depth, attaching it in two spots with Mini Glue Dots(103683) so it would stay curled off the card.  By giving a hand made card, I think the “thinking of you” sentiment means just a little bit more, don’t you?

Share and Enjoy:
  • Print
  • Facebook
  • Twitter